Monday 25 March 2013

Pike and Shotte Test Game


I am lucky enough to game at a small but active club, which has members with a great diversity of interests, and between them a vast collection of wargaming resources.

For this test of the Pike and Shotte ruleset, two club members - Mike Schubert and Mike Karsten - contributed enough English Civil War figures from their collections for a game (on a table approximately 6ft x 18ft) with batallia-sized commands for 6 players. It was a fantastic introduction to an era and a conflict completely unfamiliar to me.

Over a swath of countryside, a Parliamentarian army (left of table in the first image below) of comprised of a foote battalia on each flank, and a central horse battalia supported by a small foote detachment, faced a Royalist attack. With a very similar deployment (horse battalia central, with a foote battalia on the far right, and a Scots Covenanter detachment on the right, supported by dragoons and light horse), the King's men planned their offensive.

Starting positions: Parliamentarian force at table left.


View from the opposite angle - left flank of Parliamentarian forces at right of pic.
Anyone familiar with the Warlord Games family of rules (Black Powder, Hail Ceasar) will know that they revolve around the twinned effects of command and morale, and battles are won and lost by the application (or not) of succinct orders. Pike and Shotte is no different, and the Royalist offensive started with the flank commanders failing to motivate their troops to follow their initial battle plans. Their central command, however, was eager, and the horse advanced confidently.

However, their confidence was met with an aggressive response from the Parlimantarian horse, who in the first few turns of the game routed the Royalist Horse, and punched a hole right through the centre of the Royalist line. Their right flank was now exposed to a threatening cavalry force. On the left, the Royalist Scots commanders struggled to maintain order within their units as they forded the river to the Abbey, resulting in their troops arriving piecemeal to engage an organised line of defenders.


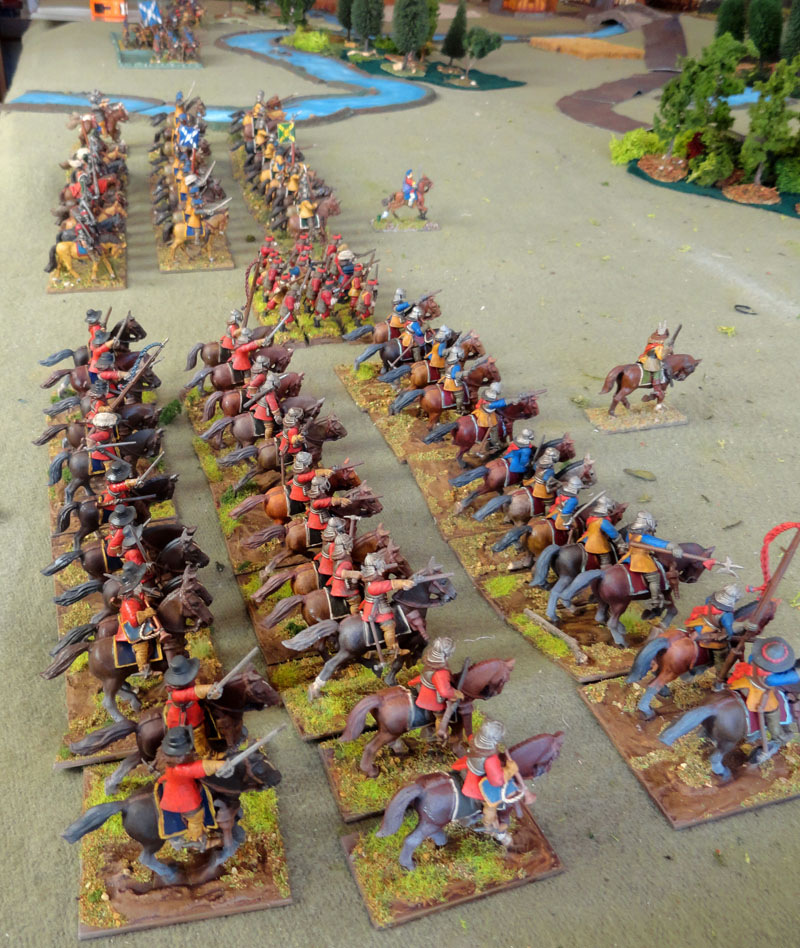
Royalist Horse brimming with confidence.
Charles Essex's regiment lead the line.

Parliamentarian Horse counterattacks in the centre.

A foote detachment advances to exploit the gains made by the Parliamentarian horse in centre field.


The subsequent turns of the game saw the Royalist right forced into hedgehogs by the cavalry threat they faced, while suffering withering musket and ordnance fire - an unsustainable position. On the Royalist left, even a charge by a Highlander regiment did not buckle the defender's line. With that, the game was conceded.

Pike and Shotte feels to me (if I can be allowed to judge after just one game) to have benefitted from being the third in the Warlord rules series - it doesnt appear to have many of the "first edition" rough edges that are apparent in Black Powder, and the ruleset seems clearer and simpler than its older "cousins". I dont know enough about the era to judge how well Pike and Shotte represents the tactics and weaponry of the time, but the verdict from others around the table was positive.

You can find a project gallery of Mike Schubert's English Civil War army here.

Sunday 17 March 2013

Ohio Valley Episode

Muskets and Tomahawks is fast becoming one of my favourite rulesets - its activation system makes for a dynamic game that keeps all players involved all the time, it flows well and feels fast, and every game we have played has been fought to a result within an hour or few. This last is important - as its one of the games that we play at our midweek evening game meets, and there is no scope for games that drag on.

Also in its favour is that it need very little setup time - its very much skirmish scale, so the average game needs just 36-72 figures per side.

The activation, movement, shooting, observation and morale rules all combine to represent very well, in my mind at least, the protaganists, terrain and weapons of the conflict.  It has layers of special rules (to be fair, so many that we often forget to apply some) that create a good sense of the "asymmetrical" warfare of the conflict - native inhabitants completely comfortable in dense terrain versus regulars who would much rather pick their fights in open fields or defended positions.

Its a lot of fun.


Our last game of M&T saw a small British force (12 regulars, 12 rangers and 12 Mohawk) attempt to escort a captive (which was attached to a particular unit, and slowed it down to civilian pace) across the table, pursued by Huron (36) and Canadian militia (12). Sounds easy enough, but the entire table was wooded! With civilians and regulars moving very slowly in forests, it meant that the regulars would need to use every activation (and some granted by their officer) to keep moving and stand any chance of success. And they would need luck, and a headstart! Their only other option would be to stand and fight, and hope to see off the Huron. Not a pleasant prospect for the regulars at least, deep in the Ohio woodlands...


The dice and the cards of fate were against the British, and they didnt get the headstart they needed. The Canadians diced onto the table on the first turn, right behind (and within musket range of) the British regulars. The regulars had to abandon hope of making the objective, and face the threat. The rest of the game was a test of the discipline of both sides, as more and more Huron joined the fray. The small band of regulars, with rangers on the left and Mohawks on the right were well set upon. The Canadians left early, ripped apart by a few volleys from the regulars. On the right flank the Rangers caught a charge from a unit of Huron, and recoiled directly into musket range of another Huron unit. A second charge and they were cut down to a man.

On the left, the Mohawks managed to close the line with the regulars, and there was hope for the British. Turn 4 started with the British 1 casualty away from the dreaded Morale card being added to the deck, and the Huron 3 away from the same fate. But some poor shooting from the regulars (they had passed successive morale checks as they lost troops, and it obviously made their dice rolling shakey) sealed their fate. Turn 5 saw the British Morale card added, and when it came up early in the turn, the Mohawks left for their village. The last few regulars held their nerve, but the game was up. There were scalps to be had...

Apologies for the limited pix - I forgot my camera, and my phone camera didnt do the game justice...

The Muskets and Tomahawks forum is to be found here.
A good review of and introduction to the game can be found here.

Monday 11 March 2013

Streetfight!


A few pix of a recent 28mm WW2 game played out by myself and members of the Peninsula Wargames Group. This was another test of the Bolt Action ruleset, with a slight modification of the simple "Point Defence" scenario from the rulebook. Once more the Germans (with a "lost brigade" of Italian airborne vets) were set as the defenders, and the Russians and Partisans were on the offensive, but this time, the forces were raised to just over 2000pts a side, and the terrain was mostly hard cover and buildings...

With snacks, drinks and defenders deployed, the game began...Two of the three objectives markers were placed outside of the defenders deployment zone - objective one was the entrenchments in the church square, and objectives two and three were the central two apartment buildings (left centre in this pic) overlooking the church square.

The Germans deployed two platoons of Heer regulars, supported by a single Pak 40, and an assortment of infantry support teams - snipers, MG42s, 81mm mortars and so on. The veteran Italians were supported by a 45mm mortar, a flamethrower team and a sniper. Facing them were 7 squads plus supports of Russian regulars - a mix of inexperienced, regular and veteran Guard troops, with a smattering of Assault Engineers and a small Naval detachment. Crucially, the Red Army had 2 artillery spotters on table, directing off-table medium field guns. A single T-34 and a Bobik recce car comprised their available armour.

The game started with a preparatory bombardment that pinned a fair percentage of the defenders, and the Germans spent the bulk of their orders in the first turn rallying their crucial weapons teams, and advancing to occupy the two closer objectives. For the next 4 turns, the game was played in a very cagey, attritional style, with the Soviet squads attempting to whittle down and suppress the defenders, with some success. The Germans had lost about 5 order dice, and were feeling the pressure of the Soviet strength in numbers, but holding a solid line of buildings across the table.The Pak 40 scored a success, disabling the T-34 that was menacing its position. The two sides faced each other across the town square, neither willing to order troops to leave their hard cover.

 Italian sniper team keeps an eye on movement across the square...

...and this is what they see:


With time running out (turn 5), the Russians launched a mass charge across the square, supported by a long-delayed flank attack by the Partisans. They managed to reach the cover of the far right apartment block of the German line, and take the entrenchments on the left. That being said, the other two objectives were looking very solid for the Germans, who had taken minimal casualties amongst those in the central buildings. It looked like the Russians had left it too late.


Turn 6 saw the Soviets consolidate their position on the far side of the square, and then strike the telling blow of the game. A lucky artillery strike (double 6 on 2 dice) took down an entire apartment block, causing massive German and Italian casualties, and rendering the objective undefended. However, in terms of the victory conditions, the Germans were still ahead. If the game ended after turn 6, they could still claim victory. Fatefully, however, the dice determined that the game would go into turn 7, and with the first three orders drawn for the Soviets, they dashed to the objective. And with time running out for some of the players, the Germans conceded.

The game took a surprising length of time to play. 2000pts per side for a bunch of players new to the game was probably a bit ambitious, and the abundance of hard cover and buildings made the game much less "bloody" and less decisive in its early turns, while both sides were shooting at range. The attackers needed 4-5 turns to soften up the defenders...


Wednesday 6 March 2013

28mm Partisans

I decided I couldnt leave the Red Army facing the hostile world alone on this blog page, without its Partisan allies. These started out intended to be a purely Eastern Front force, equipped mainly with Mosin-Nagant rifles and PPD/PPSh sub-machine guns, but I have since added a few Sten-equipped individuals to make them suitable for use as Polish patriots, and, if no-one at the wargaming table is too fussy, Italian resistance.

I really enjoyed building and painting this partisan wargames band. There is something really appealing to me about about their ragtag appearance, the representation of an (sometimes) idealistic force, and the challenging limitations of gaming with their less-than-ideal equipment and organisation.

 
These two local lads I converted to carry hunting shotguns, to take advantage of the "Hunter" attribute in the Operation Squad partisan lists:


These were painted at least a year ago, and are all Artizan miniatures.

Partisans, are, I figure, a little difficult to develop beyond squads of basic foot soldiers. Without access to any of the supports or heavy weapons that hobbyists usually enjoy adding to their forces, the risk is that building a larger force becomes a cookie-cutter, repetitive exercise. But with a bit of effort spent scouring miniature catalogues for what I had in mind, I now have a plan to expand my partisan force into something approaching the "reinforced platoon" required for Victory Decision, Bolt Action (and forthcoming Assault Platoon rules from the publishers of Operation Squad). I have the following bits lined up to create their transport (horses, mules, donkey carts, bicycles, and liberated Wehrmacht wagons), command, specialists (demolition crews, dispatch riders) and such:


From the Empress SCW range come the donkey cart, the command post vignette and the lads with Beretta's (to allow more accurate representation of Italian partisans), from Westwind I got the pack mule and the civilians (destined to be hidden/ambush/objective markers), the demo team is from Artizan, and the German wagon, which will be kitbashed to suit, is from Bolt Action/Warlord Games.

They will never be able to take on a conventional force head to head, but I am hoping that given a suitable scenario, they might conduct themselves well and bravely.

Monday 4 March 2013

28mm Soviets

My original 28mm Soviet force was built for the Operation Squad rules - a game that is designed to work with just a single squad - say 5 to 15 figures, and a few support weapons deployed for each game.

However, as our Operation Squad scenarios become more ambitious, and we experiment with "platoon" level games using rulesets like Victory Decision, Bolt Action and Disposable Heroes, the need to rush reinforcements to the front has become urgent.

Here are my fresh Soviet forces painted in the course of the last week or two: eleven men, one woman, and an unfortunate dog, and the diminutive BA-64 "Bobik" armoured car:


Bobik with its first cousin:

 And with its Big Brother:


And with some of my original Soviet force, painted in 2012 or 2011:


Figures are a mix of Westwind, Warlord Games/Bolt Action, and Artizan. Vehicles are Warlord Games/Bolt Action. Decals by Company B.